MonoCurses
MonoCurses provides managed applications with an API to create console-based applications.
This API is still under development, and hence the library is not installed into the GAC.
In addition to the low-level curses bindings, currently MonoCurses ships with a minimal GUI toolkit for creating console applications.
Obtaining mono-curses
The source code of mono-curses is available in the GitHub repository. Packaged tarballs are available from http://tirania.org/software/mono-curses
gui.cs
This is a minimal toolkit and is still under construction.
The base class for creating widgets for gui.cs is by deriving the Widget class, the model uses containers and works mostly with absolute positioning, but a few flags in the Widget control expanding a widget to fill up from a given position to the end of the container (horizontally or vertically).
Class hierarchy:
   Widget
     Label
       TrimLabel
     Entry
     Button
     ListView
     Container
       Frame
       Dialog
Programming with gui.cs
To run an application, you must first initialize the toolkit and create a container. Pick from one of the existing containers (Container, Dialog, Frame). Add your widgets to the container calling the Container.Add (Widget) method. Once your dialog is ready, you can call Application.Run(Container) method to start the main loop.
This is a very simple example:
   Application.Init (false);
   Dialog d = new Dialog (40, 8, "Hello");

   d.Add (new Label (0, 0, "Hello World"));
   Application.Run (d);
The above creates a dialog box with 40 columns and 8 lines, with the caption “Hello” and adds to it a label at 0, 0 that says “Hello World”. Then we execute the dialog.
In particular, Dialogs are aware of buttons, you can add buttons to a Dialog, and the dialog will take care of laying them out for you. Use the Dialog.AddButton method for this.
Buttons are a convenient way of stopping a dialog from running once they have done their task. For example:
    Dialog d = new Dialog (40, 8, "Print");

    Button b = new Button ("All Pages");
    b.Clicked += delegate {
       PrintAllPages ();
       d.Running = false;
    };
    d.AddButton (b);

    b = new Button ("Current Page");
    b.Clicked += delegate {
       PrintCurrentPage ();
       d.Running = false;
     };
     d.AddButton (b);

     Application.Run (d);
The Main Loop
When the application is initialized, the curses timeout function will be set to the value of Application.Timeout which defaults to -1, which is used to block until data is available on the keyboard. Usually you would set Timeout to the number of milliseconds that you want before the main loop is executed again.
For example, if you want the main loop to iterate every second, you set Timeout to 1000 (1000 milliseconds) and then call Application.Run. This will raise the Application.Iteration event which you can hook up into and update the screen display as necessary.
Containers
There are a number of containers in gui.cs, these are:
Container the base class for containers, you can use this one if you want to just group widgets in it. This provides the basic operations for container-widget relationships, event dispatching and the default container actions.
Frame is a container that has a thin frame around all the controls and has a caption.
Dialog this is a container that has a thicker border, uses a different color scheme (and any widgets inserted into it will by default, because they inherit the colors from it), has support for automatically laying out buttons that are added with the AddButton (Button b) method and will automatically be centered on the screen (even during a screen resize).
Input
When a character is read, the main loop passes the character to all the containers and widgets using the Widget.ProcessHotKey method. This gives a chance to certain widgets to capture the data before other widgets do, it is used to implement hot keys (for example buttons automatically create a hot-key for the combination Alt-letter for their highlighter letter).
If no widget consumes the event (by returning true from the ProcessHotKey event) the key is sent to the focused widget. If the event is not consumed (by returning true from the routine) then the default behavior is applied: tab and down-cursor are used to switch the focus to the next widget that can accept the focus, Control-c is used to terminate the current main loop and control-z suspends the application.
Rendering
Widgets are responsible for filling the entire space that they own. The space is determined by the area delimited by Widget.x, Widget.y, Widget.w and Widget.h . These are public fields in every widget.
To render the widget, widget authors must use the Widget.Move(int line, int col) method. This will take care of positioning the cursor in the right location when widgets are nested in containers (and in particular, for containers of type Dialog and Frame, the 0,0 position represents the first addressable character inside these containers).
Widget authors will want to set the default color using Curses.attrset to paint with a given attribute and then call Widget.Clear to erase the entire region that has been assigned to it.
Each widget can use four colors during rendering: Widget.ColorNormal, Widget.ColorFocus, Widget.ColorHotNormal and Widget.ColorHotFocus. These are useful shortcuts that can be used to paint the widget.
ColorNormal should be used when the widget is not focused, ColorFocus when the widget has the focus. ColorHotNormal can be used to render any values that must be highlighted (for example, the hotkey for a button) and ColorHotFocus is the color to be used when rendering the highlighted value when the widget is focused.
Other colors are available from the Application class:
ColorMarked          - When an item is marked.
ColorMarkedSelected  - When an item is marked and selected.
ColorError           - Used to represent errors
Some variants of the standard colors to be used while creating dialog boxes are:
ColorDialogNormal
ColorDialogFocus
ColorDialogHotNormal
ColorDialogHotFocus
For example, the Button.Render method looks like this:
 public override void Redraw ()
    {
        Curses.attrset (HasFocus ? ColorFocus : ColorNormal);
        Move (y, x);
        Curses.addstr (text);
        Move (y, x + hot_pos);
        Curses.attrset (HasFocus ? ColorHotFocus : ColorHotNormal);
        Curses.addch (hot_key);
    }
Cursor Positioning
Not all terminals support hiding the cursor, for those terminals it is important to place the cursor in a place that would not distract the user attention.
Every widget should implement a “PositionCursor” method that will place the cursor in the best position in a widget to draw the user attention to that place. In button this is the highlighted letter, in a list-view widget, it should be the first column of the currently selected line, in an entry widget, it should be the place where the cursor is.
To do this, merely override the PlaceCursor method.
This is the Button implementation:
 public override void PositionCursor ()
    {
        Move (y, x + hot_pos);
    }
Resizing
When the window size changes, the event SizeChangedEvent will be raised in the toplevel container, and the virtual method DoSizeChanged will be invoked in the toplevel container as well. The default behavior for containers is to propagage the DoSizeChanged event to children.
You can either hook up to the container event in your client code, or you can have your widgets override the DoSizeChanged event to cope with window size changes.
The dimensions of the window are available in the Applications.Cols and Application.Rows properties.
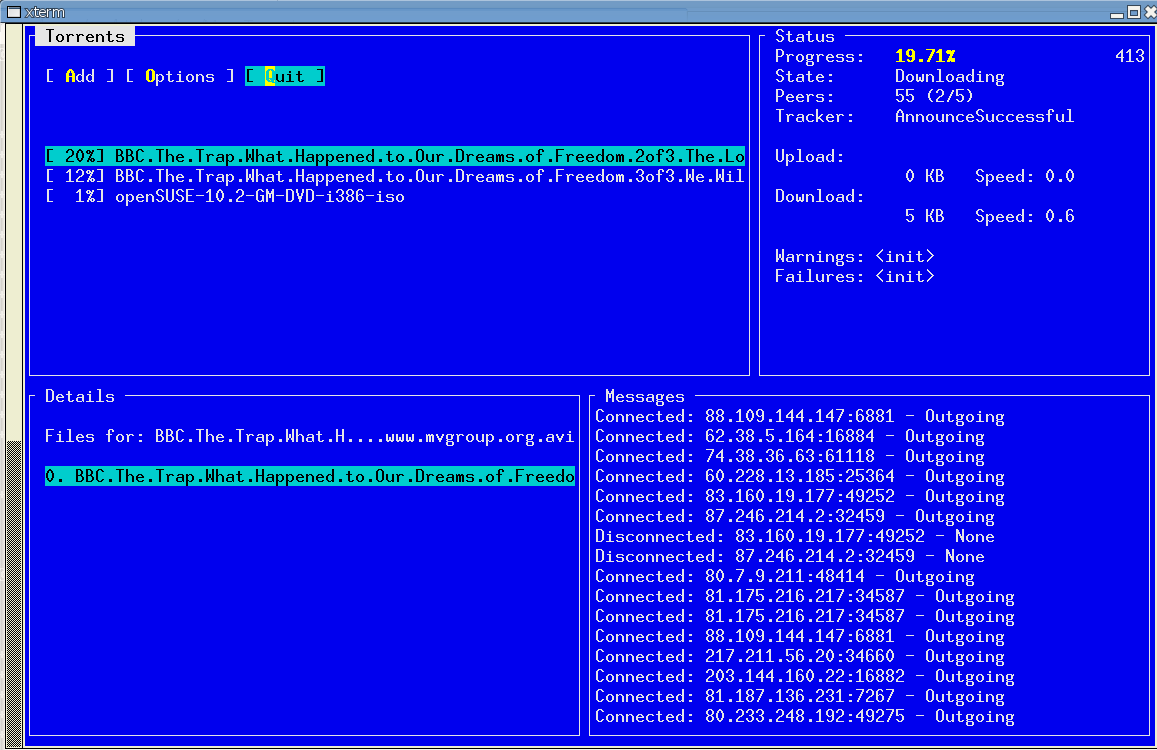
In the sample MonoTorrent application, the layout of the toplevel dialogs and the important widgets is all encapsulated in a routine called LayoutDialogs. This is how the setup takes place before calling Application.Run:
 LayoutDialogs (ftorrents, fstatus, fdetails, fprogress);
    a.SizeChangedEvent += delegate {
        LayoutDialogs (ftorrents, fstatus, fdetails, fprogress);
    };
Missing things
Mouse support, should be easy to add.
More widgets
Idle and timeout handles, instead of depending on the hack that is setting Application.Timeout