This page is likely outdated (last edited on 03 Dec 2007). Visit the new documentation for updated content.
CSharpPlugin
Xcode Plugin and supporting files for Mono C# integration
This page is no longer maintained. Please use the latest version at http://code.google.com/p/cocoa-sharp-dev/wiki/CSharpPlugin
Susan Mackay
Abstract
This document describes the installation, use and some of the background details of an Xcode plugin that allows the use of the Mono C# development environment.
If you just want to get the code installed and running, then please start at the “Installation” section. If you want to understand how this plugin came about and how it operates (also why it has some of the ways of doing things and limitations that it has) then please read the introductory sections.
Quick Start
If you just want to get started, then follow these instructions. Be warned that they assume you know your way around the file system, and they do not cover the gotcha’s:
- View the source code from http://cocoa-sharp-dev.googlecode.com/svn/trunk/csharpxcodeplugin/
- Get the source code from https://cocoa-sharp-dev.googlecode.com/svn/trunk/csharpxcodeplugin
- Compile code in XCode.
- Copy the ‘
build/release/CSharpPlugin.pbplugin’ to ‘~/Library/Application Support/Apple/Developer Tools/Plug-ins’ - Copy all files in ‘
Project Templates/C Sharp’ to ‘~/Library/Application Support/Apple/Developer Tools/Project Templates/C Sharp’ - Copy all files in ‘
File Templates’ to ‘~/Library/Application Support/Apple/Developer Tools/File Templates’ - Copy all files in ‘
Target Templates’ to ‘~/Library/Application Support/Apple/Developer Tools/Target Templates/C Sharp’
Starting Xcode should now show executable, library and Cocoa# New Project templates under a ‘C Sharp’ heading, executable and library target templates also under a ‘C Sharp’ heading, and a ‘C Sharp’ new file type.
Test it out by creating a ‘New Project’ form the Executable template and click the ‘Build and Go’ button. You should see the compilation take place and then the display a variation of the classic ‘Hello World’ theme.
Preface
I am fairly new to the OS X environment having bought a new MacBook Pro just a few months ago. However I have been using C# (mainly within the Microsoft Visual Studio range of IDE’s) since the whole “.NET” thing started and C# was first introduced.
Therefore, I was keen to start to transfer a number of my projects over to the Mono environment as well as beginning to use the Xcode environment for my development. I quickly discovered that Xcode was heavily slanted towards the C/C++/Objective-C languages through the use of the GCC product. While there has been some talk of someone providing a C# ‘front-end’ to the GCC, I’m not aware of anything being available yet, or planned for sometime soon.
I think it was Isaac Newton that said, “If I have seen further than others, it is because I have stood on the shoulders of giants”. Well, this is certainly true of this little project.
Searching the Internet, I found the ‘Mono Tool’ project by Mark Satterthwaite, as well as several integration projects based on Ada and OCaml by Damien Bobillot (http://maxao.free.fr) plus his series of documents explaining how plugins are constructed (http://maxao.free.fr/xcode-plugin-interface/).
I was not taken by the approach of Mono Tool, which, while it works and does provide feedback on errors etc., seems to be a slightly awkward approach, especially as it does not allow for source files to be stored in a hierarchical manner, nor does it easily adapt to creating or using library assemblies. Perhaps it was just me!
Damien’s approach ‘appealed’ more to me. However, I didn’t know Objective-C (and really I still don’t) so this added one more ‘learning curve’ into the equation.
Three books have helped me a lot. Firstly there is “Beginning Mac OS X Programming” by Trent McCormack (Wrox), which helped a bit with the Objective-C part. Both “The Max Xcode 2 Book” by Michael Cohen, Dennis Cohen and Andy Ihnatko (Wiley) and “Beginning Xcode” by James Bucanek (Wrox) gave me a good insight into how Xcode works, and, in particular the latter book, some of the internal of its operation.
Of course, there is also the large body of code included with Xcode itself, particularly in
/System/Library/PrivateFrameworks/DevToolsCore.framework/Versions/A/Resources
There is a log of great stuff here – if you can reverse-engineer and/or understand it.
I have also used little bits and pieces of code and ideas that I’ve found in various news groups and other areas of the Internet. If you think that I’ve used a bit or your code and I’ve not acknowledged you, then firstly my apologies, and secondly I acknowledge your contribution now.
It has been said that “no work of art is ever completed – merely abandoned”. While I don’t feel that I have ‘abandoned’ this project, I do feel that it has reached a stage where it is useable and should be made available. I have supplied all of the source files needed to completely rebuild the plugin, as well as the ancillary files needed to bring C# to Xcode. Please feel free to extend this work, and/or let me know of what works (and what doesn’t – I make no claim that it is bug free or will work for any particular situation1) so that we can all make it better. In particular I am interested in hearing from anyone about how to better parse the source code within Xcode to improve the “Intellisense”-like operation.
1Insert your usual legal disclaimers here about fitness for purpose etc., that usage is purely at your own risk, and that I am not responsible for anything!
Approach
There appears to be a fundamental difference in the way Xcode is set up and they way Mono/C# programs are created. Xcode seems to want to follow the ‘traditional’ scheme where there is a fairly ‘one-to-one’ line from the original source code (in the case of code generated form Yacc etc.), through the headers and code file to an object file. It is only when the object files are brought together by the linker is there a significant combining of the files into a unified ‘whole’.
On the other hand, the C# compiler requires that all source files are brought together right from the start. This allows such constructs as partial classes, which can separate parts of a class definition into a number of files, but the compiler seems the whole definition at once. It also eliminates the “forward reference” issues between classes.
Xcode has ‘compile’ and ‘link’ phases, where the ‘compile’ phase operates on a single file at a time, and the ‘link’ phase, which expects to bring together, all of the object files generated during the compile phase, with any libraries2.
After a couple of attempts, (I’ll spare you the details, but all involved strange goings-on in the background that stopped something else from working properly!) I realised that it was possible to recognise when the first source file was being processed and so build the basis of the compile command. Each subsequent source file simply built on that basic command. However the command was not executed at all. In the link phase, the same command was extended further to include all library assemblies, thus completing the required command.
The end result is a plugin that works in the expected ‘style’ of Xcode, that generates the required Mono command line, can report errors back to the source line (Mono reports to the source column as well, but Xcode does not appear to handle this), can create library and executable assemblies within the same (or separate) project(s), and can execute the result (albeit without the debugger).
2This is demonstrated by the ‘compile’ code used in this plugin is called once for each source file, but the ‘link’ code is called once with all of the files available. I tried placing all of the source files in the ‘link’ phase, but this is not intuitive and seems to go against the way Xcode operates.
Scope and Exclusions
The basic intension of the plugin is to allow the programmer to do anything that could be done in the terminal with a suitable editor and the (g)mcs and mono commands. I think that I have achieved much of this but certainly not all.
The Xcode editor understands the basic C# syntax and can highlight comments, keywords etc., but it has no understanding of the structure of the source. For example, it does not recognise when the cursor is in a ‘get’ or ‘set’ portion of a property definition – it just displays the overall class name.
It has no equivalent to the “Visual Studio” Intellisense – Xcode does have a default equivalent for this, but, as it applies to C# it is reduced to listing similar names that you have entered elsewhere in the source file. It does not understand which methods/properties belong to a class reference (typing “Console.Wr” will not show that “Write” and “WriteLine” as possible methods at this point).
Not all of the (g)mcs compiler options are available, but mainly those are the ones that relate to testing the (g)mcs complier itself – I left those out on purpose. However there is an “Other CSharp Flags” option that you can use to put in anything you want to appear in the command line. You are responsible for formatting it correctly, but you don’t have any option about where they appear – they will always be straight after the command name and before any source/library file references, as do all of the options that are available to you.
Another “odd” option is ‘-target:’ in that this is generally pre-defined for you to be either ‘-target:exe’ or ‘-target:library’ depending on the type of the target template you have used. An option does appear called “TARGET_TYPE” which shows the value and this can be edited if necessary.
The default ‘Executables’ definition created for a new executable project will run the generated executable assembly, even if other library targets are added to the project. Unfortunately, the opposite is not true: if you create a new library project and then add an executable target, the “Executables” entry that is created will not run the program properly (it assumes the “.exe” is directly executable and does not require the Mono environment). You can correct this my creating a ‘Custom Executable’. This all means that, if you want to create library and include a small ‘test’ program, then you should start with an ‘executable’ project and add the library; it means less for you to do and less to go wrong.
It is assumed that you name a suitable Mono installation already in place (or at least you will have before you try to compile anything!). Also it is assumed that the (g)mcs compilers and the mono runtime are in “/usr/bin”. See the “Customisation”3section if this is not the case.
3I’m originally from New Zealand and I now live in Australia. In my part of the world, we use the “English” spellings for words that often end up with a ‘z’ (pronounced “zed” by the way!!!) in American spelling. Except where the American spelling is required by Xcode or something else, I have used the spellings that I know and love so well. As always, if you don’t like it, then see the “Customisation” section to change it (talk about a recursive footnote!)
Distribution Files
The .zip file contains all of the sources and ancillary files needed to build the plugin (under Xcode of course) but you will need to copy the files to their ‘final resting place’ yourself. (If anyone knows how to create an installer, then please do)!
As distributed, it contains a copy of the project environment as it was immediately after a ‘Clean All’ and then a ‘Release Build’.
The ‘CSharpPlugin.pbplugin’ file is a universal binary, but it has only been tested on an Intel Macbook-Pro running OSX 10.4.7. Compiling from the sources, I can’t think of any reason why this should not run on any target environment that has Xcode on it4.
4I used Xcode V2.4 for this work. I see in some of the header files that I have incorporated, that there are conditional compilation markers set for V2.2 and below – I have not tried any of these so you are on your own.
Installation
There are two ways that the plugin can be installed:
- For just one user This is probably the safest in that it cannot affect anyone else who may use your system, and it does not require write privileges into any system directories
- For everyone Even this is “safe” in that it is possible to simply delete the files described below from the system library directory structure and things will be returned to “normal”.
In the following, I assume that you will install the files into your personal area (“~/Library/Application Support/Apple/Developer Tools/”)5. If you want to install the plugin for everyone, the simply use the “/Library/Application Support/Apple/Developer Tools/” path instead. To avoid repeating the full path names for each target file, assume that the “Developer Tools” is the default target location.
Further, I’m not going to keep telling you to create a directory if it doesn’t already exist: I assume that you will do this yourself. This particularly apples if you are installing the files into your own library tree – all of the folders should already exist in the system library tree.
A Word of Warning: if you copy a directory by dragging and dropping it into the target location and a directory of the same name already exists, then (after confirming the action) OS X will replace the existing directory and any files it contained with the new directory. If you are not careful, you can loose everything that was in the original directory. It is safer to create the directory if necessary, and then drag/drop the individual files
The first thing to do is to expand the .zip file. The easy way is to double-click on the “CSharpPlugin.zip” file: it will create a “CSharpPlugin” folder in the same directory as the .zip file. Open the folder (again by double clicking on it) and it will show a collection of files and folders. If you have a directory in which you place all of your projects, then you can copy this folder there. All references in the following instructions to where the files should be copied from are relative to this folder, wherever you have placed it.
5If you are not sure what the “~/”means at the start of that directory path, then 1) perhaps you should leave this alone for now, 2) you should get a good book on Unix (perhaps as it relates to OS X) and 3) it means your own personal user directory and changes depending on your account name
The Plugin Executable
The plugin makes use of additional code to provide some of the functionality6. When Xcode starts up, it looks for any plugin code (identified by the “.pbplugin” file type) in the “Plug-ins” directory. Therefore: copy the “build/Release/CSharpPlugin.pbplugin” file to “Plug-ins/CSharpPlugin.pbplugin”.
6Xcode can be extended without this, but only in a very restricted way in certain areas Despite the file type, this file contains executable code file which (according to my understanding) is a universal binary. It also contains a number of other resource files that Xcode will read in that define the language and how it should handle C# files.
Project Templates
The easiest way to set up the Xcode environment to handle C#/mono is to create a new project based on either the executable or the library project template. These templates are found in the “Project Templates” directory.
Xcode provides a hierarchical structure for the project templates: you’ve probably noticed the “New Project Assistant” lists top level entries such as ‘Action’, ‘Application’ and ‘Bundle’ with specific project templates listed underneath.
We will add an entry to this list named “C Sharp” with ‘Executable’ and ‘Library’ entries underneath it. As the names come form the directory names within the “Project Templates” directory, we can (in this situation) drag and drop the whole source directory into the target one.
Drag the source “Project Templates/C Sharp” directory into the “Project Templates” destination directory (see the waring above: this will replace any previous ‘C Sharp’ folder and its contents, but we want that in this case).
Target Templates
Within Xcode, Targets play a key role in determining how code files are handled, what products are built and which processes are used throughout.
As with the Project Templates, there are two ‘flavours’ of templates: one for creating an executable product and one for a library assembly. Targets can be added to any project, and the two Project Templates simply contain the appropriate target template as part of their definition.
The two target definition template files are distributed in the “Target Template” directory, inside a “C Sharp” folder. In a similar way to the Project Templates, when you add a new Target to a project, the ‘New Target’ assistant displays the templates in a hierarchical manner as determined by the directory structure. Therefore, having a ‘C Sharp’ folder means that the two templates will be conveniently located under a “C Sharp” top-level entry.
Drag the “Target Templates/C Sharp” source directory into the “Target Templates” destination directory. This will bring across the two “.trgttmpl” files.
File Template
So far we have installed the code that does all of the work in the background, the project templates for when we create a new project and the target templates for when we add a new template to an existing project. The last step is to install the template used when we want to add a new C# source file to a project.
The source directory “File Templates/C Sharp.pbfiletemplate” must be dragged to the destination directory “File Templates". Despite the fact that the directory has a file type, it really is just a directory. However the file type helps to tell Xcode that it should expect, not only a template of the new file, but a ‘.plist’ file to tell it about the file.
Testing the installation
With the above file transfers, everything is in place for Xcode to start using the plugin.
Begin by starting Xcode and choosing the File->New Project options. Within the “New Project Assistant”, check that there is a top level item “C Sharp” with “Executable” and “Library” entries underneath it. As you click (once) on each entry, you should see a description of each option displayed in the bottom window. Double-click on Executable and enter whatever project name you want before completing the form.
You should now be looking at a window like the following:
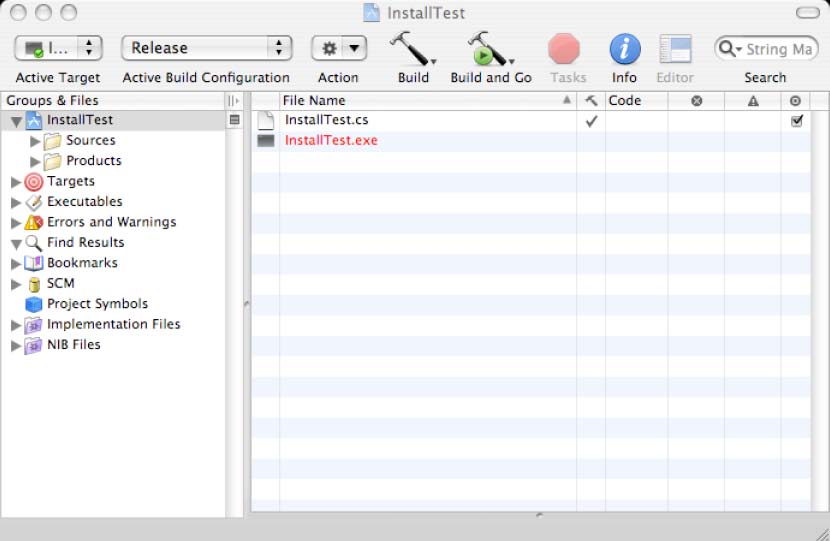
I’ve used “InstallTest” as the name of my project.
As a first test, simply click the “Build and Go” button. You should see the “Build Window”:
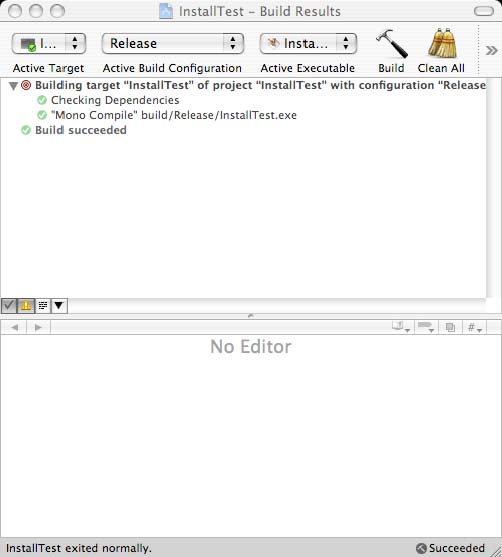
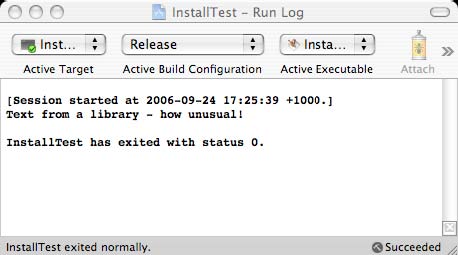
and the Run Log window:
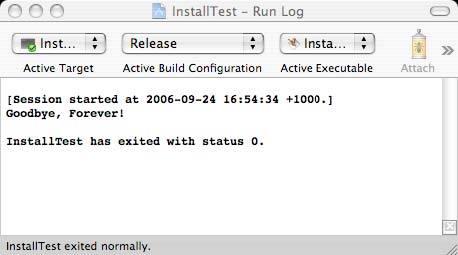
with very similar results to those shown.
If you have, then you have demonstrated that the project template and the plugin code are all working, that Xcode is talking with the gmcs compiler, and that the mono runtime can run the resulting executable assembly.
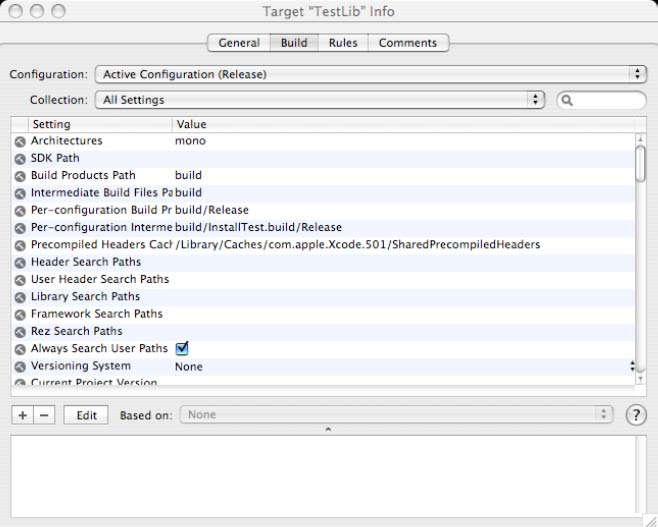
The next step is to right-click/control-click on the ‘Targets’ entry, and select Add->New Target… popup menu options. The ‘New Target’ assistant should be displayed showing a “C Sharp” top-level entry with ‘Executable’ and ‘library’ underneath it. Double-click the ‘Library’ entry and give it a name. An inspector window for the new target should appear. Click on the ‘Build’ option button at the top and the display should be like the following: I’ve used the name “TestLib” for this target. Note the ‘Architectures’ value: it should be ‘mono’.
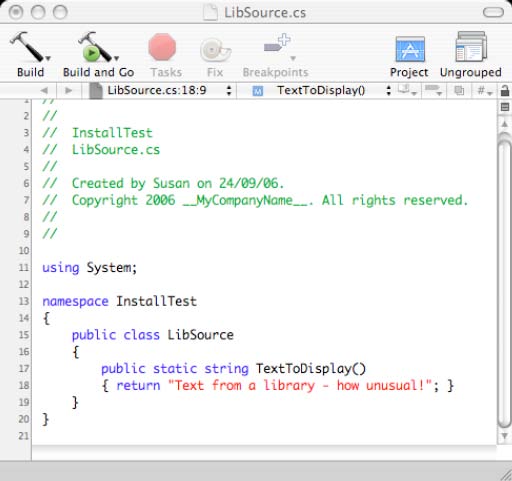
Close the inspector window, and right-click/control-click on the Sources item, selecting Add->New File… form the popup menu. This time, the New File assistant should only display a top-level entry of ‘C Sharp’. Clicking (once) on this entry displays a very useful description7. Double click the ‘C Sharp’ entry, give the file a name (I’ve used ‘LibSource’) and select the targets to be ‘TestLib’ (and not ‘InstallTest’ which it defaults to).
Open the new source file and add in a new method like the following:
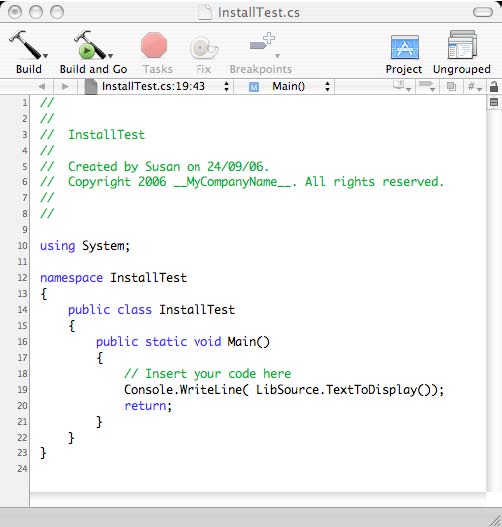
Now go back to the main project window, and open the original source file. Change it to reference the library, as in the following:
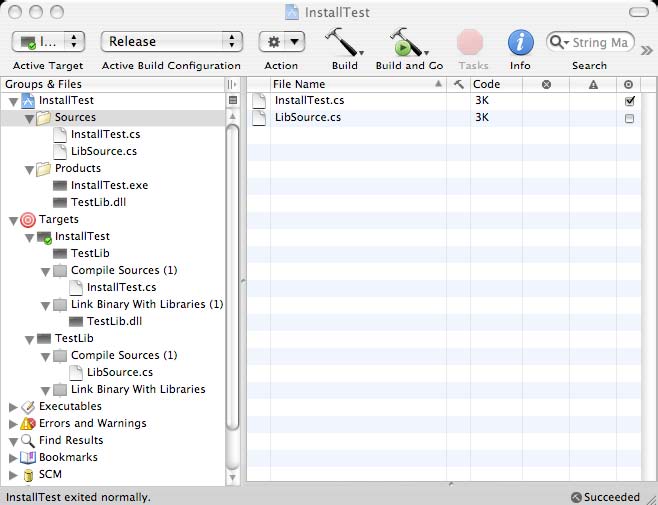
Before you compile anything, go back to the main project window, drag the ‘TestLib’ target to just under the ‘InstallTest’ target to tell Xcode that the main program depends on the library as well as its own source code.
Finally, you need to tell the plugin that there is a relationship between the library and the executable assemblies. Drag the ‘TestLib.dll’ product into the ‘Link Binary With Libraries’ entry in the ‘InstallTest’ target.
Click on the Build and Go button and you should get the following windows: and
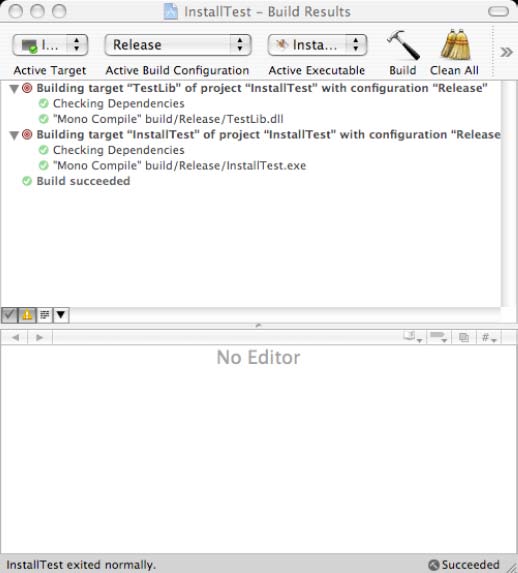
You have now built both a library and an executable assembly, and run the entire thing within Mono.
Make some change to the ‘LibSource.cs’ source file (say, change the text that is returned), and then just hit the Build and Go button again. You should see the recompilation of the whole project.
At this point, you can assume that everything has been installed correctly and is in full working order.
7Note the sarcasm in this statement!
Using the CSharp Plugin
Please see the ‘Testing the Installation’ section above for a simple demonstration of how to create a stand-alone executable assembly, and an application with both a library as well as an executable assembly.
Both of these are very simple cases, involving only a single file in each assembly. However it should be ‘obvious’ how to add additional files to a target, additional libraries and so on. Rather than talk about this, I’ll assume you can use Xcode enough to make progress, and I’ll go on to the use of the (g)mcs command options and other areas of use of the plugin.
Passing Options To The Compiler
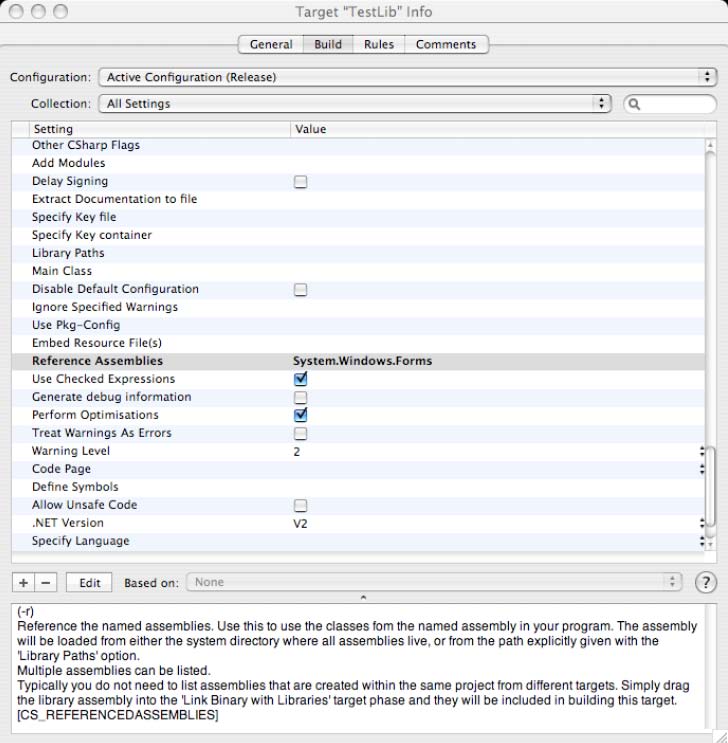
The above picture shows the Target Inspector for the TestLib target from the ‘Testing the Installation’ section with some items highlighted.
The main part of the window shows all of the options that are available to pass on to the (g)mcs compiler. Each is described in the bottom pane as you click on it.
In this example, the ‘Reference Assemblies’ option has been clicked and the ‘System.Windows.Forms’ assembly name entered. When the plugin builds this target, it will include a reference to the named assembly.
The descriptions all follow the same basic structure:
- The (g)mcs command line option that will be used is shown in the top line
- A description of the option is given. In many cases this is the same (or similar) text as you get form the compiler’s ‘man’ page (plagiarism!). However I have sometimes change it to make sense in the current situation
- The bottom line shows the environment symbol that you will need to reference if you, for example, create a custom executable for the project and fire up a shell script.
In general, the format and way of editing the values follows the Xcode style.
An important point to note about all of these options is that they are all located on the command line immediately after the name of the compiler and before the source file names.
The following subsections list all of the available options using the names as they appear in the Inspector window. They do not provide detailed descriptions of what the options mean to the compiler; rather they describe the way the information should be entered and is passed to the compiler.
Other CSharp Flags
Not all command line options are made available through the other options listed below. Typically these are the ones that are used to debug the mono compiler itself and are therefore not of real interest to programmers who are simply using the compiler.
If you r’eallyfeel the need to use a particular command line option and it is not available elsewhere within the list of options, then this is the place to put them.
Multiple options can be added if necessary. If you are using the drop-down sheet in the inspector, then add each one on a separate line. If you are editing the option value ‘in line’ on the inspector window, then separate each by a space.
Whatever you enter as values for this option are placed directly into the command line. Therefore you are responsible for all formatting etc..
Add Modules
This option allows you to specify additional modules that are to be included into the assembly.
While the command line option lets you use the option once followed by a list of comma separated module names, Xcode will add each of the modules you specify preceded by the option name. This pattern is followed by all options that can take multiple values.
Delay Signing
This is a simple yes/no option.
To avoid cluttering up the command line passed to the compiler, the plugin uses the fact that the compiler ‘assumes’ the “no” option of this flag. Only if you click on the inspector entry box will the option be added to the command line in its positive form.
Extract Documentation To
A single file path value can be entered against this option as the name of the file to be created with the XML-formatted documentation drawn from the C# documentation comments.8
8The C# Plugin ‘knows’ about the documentation comment introducer of “///” but it has no idea how to handle this within the editor. It is not treated as a macro and expanded according to the location as it is within Visual Studio.
Specify Key File
This option allows the entry of a single file path value as the name of an existing ‘strong key pair’ (.snk) file.
Specify Key Container
This option is very similar in the way it operates to the ‘Specify Key File’ option above, except that it refers to a container rather than a full key pair.
Library Paths
The mono compiler has certain built-in file paths it uses to search for library files. This option allows you to add multiple additional file paths to this list.
If you are entering the values in the drop-down sheet on the inspector window, then add each path on a separate line. If you are entering the paths ‘in line’, then separate each one by a space.
Watch out for file paths that contain spaces and double quotes around any that do. If you don’t, Xcode will assume that the strings on either space of the space are two, separate, file paths and will create a command-line option for each of them. This applies to entering the file paths in the drop-down sheet as well. If you close the sheet and then open it again, any unquoted file paths with spaces will appear as two separate lines!
Main Class
This option allows you to specify the name of a single class that is to be used if there are multiple ‘Main’ methods in the source files.
Disable Default Configuration
This is a simple yes/no option where you click on the box to select it.
To avoid cluttering up the command line passed to the compiler, the plugin uses the fact that the compiler ‘assumes’ the “no” option of this flag. Only if you click on the inspector entry box will the option be added to the command line in its positive form.
Ignore Specified Warnings
This option allows you to enter the numbers of one or more warnings that can be generated by the compiler.
Separate each number by a space if you are editing the value ‘in line’, or enter one number on each row in the drop-down sheet.
Use Pkg-Config
You can enter the names of one or more packages to which the compiler will apply the ‘pkg-config –libs’ utility and use the resulting information. No special provision is made by the plugin for the ‘dotnet’ option that can be specified to the compiler; you will need to add this value yourself with any other package names. The compiler will ‘know what to do’.
Embed Resource File(s)
This option allows you to enter one or more file paths to existing resource files that will be added into the assembly.
Be careful to use double-quotes around any file path that contains spaces, or Xcode will pass the fragments on either side of the space as separate paths to the compiler.
If want to specify an alternate name that will be used to reference the resource file, add the name immediately after the file path with a comma in between.
Referenced Assemblies
The value(s) specified in this option tell the compiler which assemblies must be included in the compilation. Typically these are assemblies in the GAC and are referenced by their name (e.g. ‘System.Windows.Forms’).
While it is possible to use this option, library assemblies that you have created in this (or another) project are not specified here. Rather they are automatically included by being added to the ‘Link Binary with Libraries’ build phase.
Use Checked Expressions
This is a simple yes/no option.
By default this value is selected, and the plugin will not include anything in the command line in this case. If you deselect the option, then the compiler command will include the option to turn off expression checking.
Generate Debug Information
This is a simple yes/no option.
If this option is selected, the required compiler option will be added.
Perform Optimisations
This is a simple yes/no option.
By default this value is selected, and the plugin will not include anything in the command line in this case. If you deselect the option, then the compiler command will include the option to turn off optimisations.
Treat Errors as Warnings
This is a simple yes/no option.
If this option is selected, the required compiler option will be added.
Warning Level
This option allows you to select from a pre-defined set of warning level values that range from 0 to 4.
To select a value, click anywhere in the value part of this option to bring up a list of possible values. The current value is indicated by a tick mark, and you can click on any other value to select that one.
Code Page
This option allows you to select from a pre-defined set of values.
Note that this option sets the code page for all source files used in the compilation, and cannot be set for an individual source file.
Define Symbols
This option allows you to define one or more symbols that can be used by all of the source files for conditional compilations either by using the ‘#if/#else/#endif’ preprocessor directives and the Conditional attribute.
Multiple symbols can be defined, one on each line in the drop-down sheet, or separated by spaces in the ‘in line’ editor.
Allow Unsafe Code
This is a simple yes/no option.
If this option is selected, the required compiler option will be added.
.NET Version
This option is a bit different from all of the others in that it does not become a command line option. Rather it is used internally by the plugin to select between the mcs and gmcs compilers.
The default is ‘V2’ which selects the gmcs compiler and links the assembly against the V2 versions of the .NET assemblies.
Selecting V1 uses the mcs compiler and links the created assembly against the V1 versions of the .NET assemblies.
Specify Language
This option allows you to select from a pre-defined set of values.
Note that this option sets the code page for all source files used in the compilation, and cannot be set for an individual source file.
TARGET_TYPE
This option lies a bit outside the others and, in general, should not be altered. It is initially set to either ‘exe’ or ‘library’ depending on the type of the assembly that you are creating.
If you need to change this (to either ‘winexe’ or ‘module’ which are the other acceptable values), then simply edit the option value directly. Note that there is no ‘set of values’ available to you to select from.
Using the Plugin
If you have run through the “Testing the Installation” section, you will have already seen how to create a project with a library and an executable assembly. However that section skipped over a number of details and left a bit unsaid.
You can skip this section if you think you have enough to do what you want to with the plugin, but remember it is here, so you can return if there are additional things you want to do. I outline not only what you can, but also what you can’t do with the plugin.
Creating an Executable Project
This is probably the most common starting point in working with C#/Mono within the Xcode environment.
The steps in creating a C# project are exactly the same as for creating any new project in Xcode: start the New Project assistant, select the type of project, give it a name and top level directory, and have it set everything up for you.
In this case the project template is listed under the ‘C Sharp’ heading, and you will need to choose the “Executable’ template.
The project, as built form the template, has a number of parts to it.
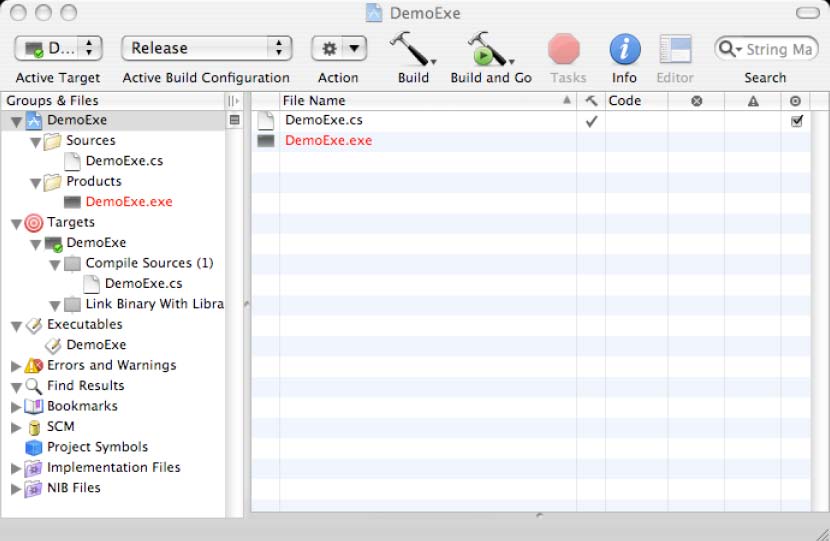
I have created a new project called “DemoExe” and expanded the relevant items in the ‘Groups & Files” panel.
Source files
A trivial source file is included that provides a basic structure for your main class.

The top of the file contains some comments that include the name of the name of the project, you name, the date the file was created and the copyright year.
James Bucanek provides information in his “Beginning Xcode” book (Wrox) about the “__MyCompanyName__” item in the header comments, and how to set it. Basically it comes down to using the terminal to enter:
Defaults write com.apple.xcode PBXCustomTemplateMacroDefinitions –dict ORGANIZATIONNAME “My Company”
where you will need to put in something sensible for the “My Company” part.
The template also supplies the standard “using System;” line which you can add to as necessary later on. A default namespace and class name (both based on the project name) are also defined.
Every executable needs a ‘Main” method and one is provided in the template. The contents of the method are up to you – I’ve just put in something so that the file will compile and do something when it is run.
You are expected to edit the existing source file as well as create/insert other source files as required.
Products
The project template creates a simple product representing a placeholder for the executable assembly that will be created by the default target (see below). This will initially be shown in red as the file it represents does not exist until after you have successfully built the target.
In general, the items listed in the Products group take care of themselves. They are created and removed as targets are added and deleted – you don’t do anything in particular to create or modify products.
Targets
A default target is created with the same name as (you guessed it) the project.
Within the Target hierarchy are two build phases:
- Compile Sources This phase contains the initial default source file
- Link Binary With Libraries This phase does not contain anything at this stage
As sources are added to the project, you have the option of which target(s) they are added to. Xcode will automatically place any new source files into the ‘Compile Sources” phase. Use the standard Xcode techniques to place source files in the right phase of multiple targets.
To get at the compile options for this target, right/control-click on the target and select the Get Info menu option. The “Build” display within the inspector window will show all of the options that are available (and described above). A number of the options listed are irrelevant for C# and Mono, but I haven’t found a way of suppressing them; and they are ignored when it comes to building the command line anyway.
You can add additional targets via the normal Xcode methods. The plugin provides two templates: executable and library. There is no reason why you cannot have multiple executable targets in a single project, but I would imagine the more typical arrangement is to have one executable assembly target, and zero or more library assembly targets. Each target will be built into a single assembly file (represented as an entry in the Products group) with the appropriate file type (‘.exe’ for executable and ‘.dll’ for library assemblies).
Associating Targets
By default, adding a library target to a project does not associate the library with any pre-existing targets. In particular, if you make a change to a source file that contributes to a library assembly, the build process will update the library assembly, but not any other target that may logically depend on it.
Such inter-dependencies between targets must be specified explicitly at two separate levels.
If you want to have the dependent assemblies rebuilt when another is rebuilt, then either drag the target icon to just below the icon of the dependent target, or right/control-click on the dependent target, select the ‘Get Info’ menu option and add the other target in the ‘Direct Dependencies’ panel in the General tab.
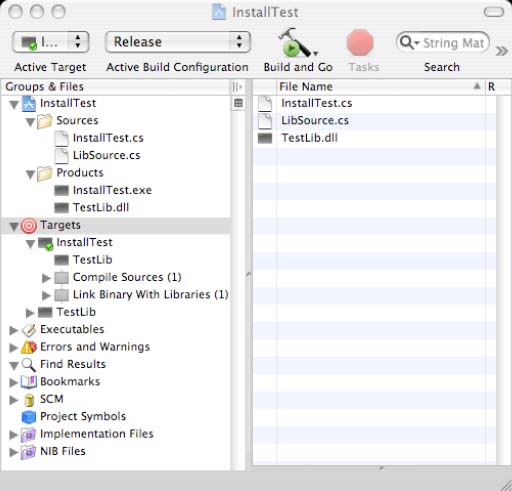
The picture above comes from the InstallTest project described in the “Testing The Installation” section. The ‘TestLib’ icon just under the ‘InstallTest’ target shows the linkage just described. This type of linkage is needed if the library interface is likely to change and the dependent assemblies must be recompiled each time. When you rebuild (in this case) ‘TestLib’, ‘InstallTest’ will also be rebuilt. Without this linkage, any change in ‘TestLib’ will be picked up my ‘InstallTest’ at runtime as the assemblies are loaded, but not before. This is a ‘target-to-target’ level linkage.
The other type of linkage allows the building of a dependent assembly to refer to the library assembly during its construction. Drag the ‘Products” icon of the target assembly into the ‘Link…’ phase icon of the dependent target.
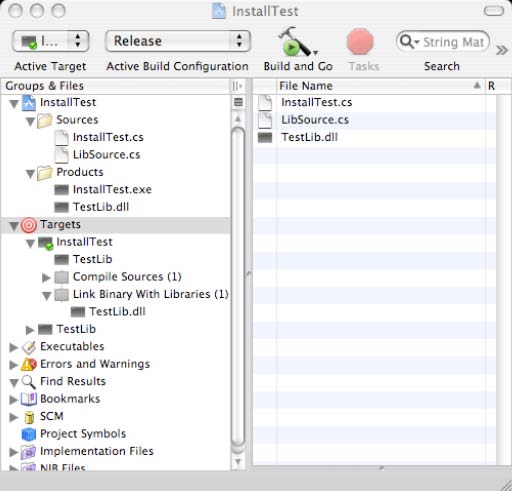
The above picture is the same as the one above it, but with the ‘Link Binary With Libraries’ group expanded to show the ‘TestLib.dll’ reference. This shows the additional icon in the ‘Link…’ phase.
This type of linkage includes a reference to the target assembly into the compile command of the dependent assembly, as is usually required for the depended assembly to compile correctly, resolving references to the assembly classes, methods and properties.
On its own, this linkage does not cause changes in the library assembly to cause a recompilation of the dependent assemblies.
In general, you will always require the second type of linkage described above, and probably you will want the first type as well. They are independent of each other.
Executables
Products tell Xcode what is being created in a build, targets tell Xcode how to build the products, and Executables tell Xcode how to run what is built.
Xcode normally assumes that the product is an application or Unix-style executable, which can be run directly. Mono executables do not follow this pattern as they require initiation by the ‘mono’ JIT’er and runtime environment.
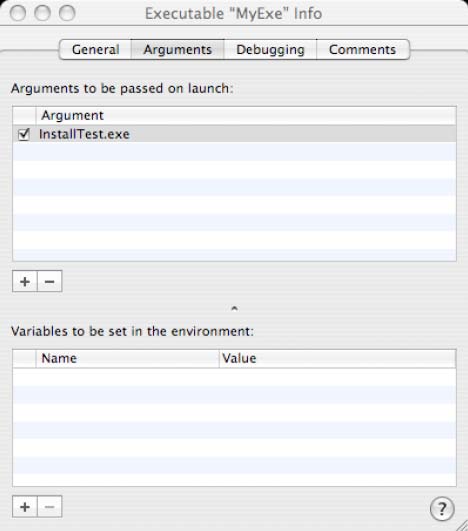
When an executable project is created, a special Executable structure is added that sets up the ‘executable’ as the mono environment, with the name of the product as an argument.
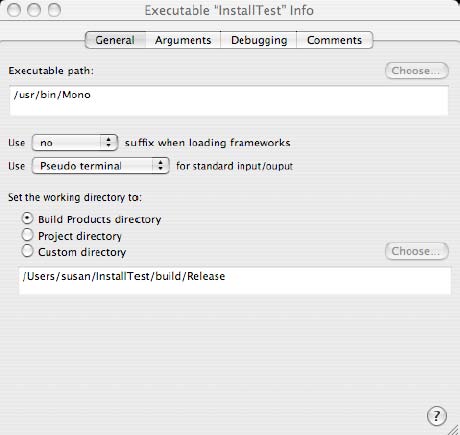
The above picture shows the inspector for the ‘InstallTest’ executable. The ‘Executable path:’ refers to the mono environment.
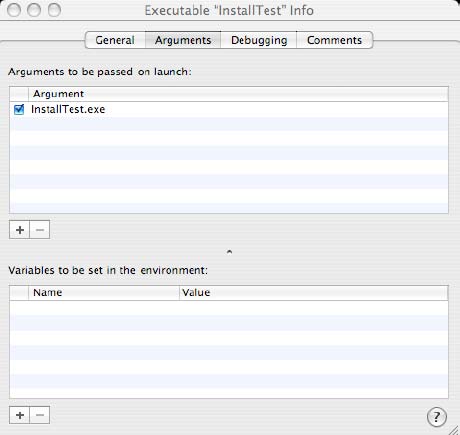
This picture shows the ‘Arguments’ panel of the same inspector, with the executable product listed as the argument.
Unfortunately, the ‘Executables’ generated by Xcode when you add a target do not allow the ‘Executable path:” to be edited except within a ‘Custom Executable’. While you can fairly easily add a ‘Custom Executable’ to a project/target, using the ‘Executable’ project template defines a suitable executable object for you.
Aside: The Executable objects are actually stored in each users profile file that is stored within the ‘.xcodeproj’ file (which is actually an opaque directory, much line the ‘.app’ file). A suitable default user profile is included in the ‘Executable’ project template, but it as been ‘hacked’ to create the appropriate Executable object. See the ‘Customisation’ section for more information.
Creating A Library Project
Basically, do everything specified in the ‘Creating An Executable Project’ except you start with the ‘C Sharp -Library’ project template. Therefore, what follows describes the differences between these types of projects rather than going over the same ground as above.
When you create a Library project, Xcode creates an ‘executable’ object but with the ‘normal’ assumptions that it is a Unix executable or an OS X application, neither of which are true. The best thing is to simply ignore this and don’t try to run your library
– it doesn’t really make sense to do so anyway.
OK, so why not add an ‘executable’ target to the project, probably to act as a ‘test’ platform for the library? While this certainly possible, you need to do a bit more work to achieve the result you would expect.
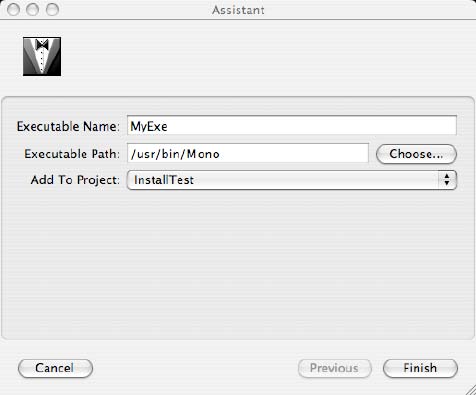
The problem is that the default ‘executable’ object created by Xcode in this circumstance is inappropriate for a mono executable; and critical parts of it (namely the ‘Execution path:’ value) cannot be edited. You will need to create a ‘Custom Executable’ for the target, listing “/usr/bin/Mono” as the executable path: Once the new executable object has been created, add in the name of the executable assembly as an argument:
Once you have this, go into the Project->Set Active Executable menu path and select the new object. This means that, when you click ‘Build and Go’ or the ‘Run’ buttons, the custom executable is the one that is used.
All-in-all, unless you only want to create a library assembly, it is probably easier to start with an executable library and then add the library targets to that – even if this is perhaps a little ‘backwards’ to the primary objective of creating a library and a stub assembly just to test it out.
Adding Targets
I think that this has really been covered in the above sections on creating projects.
Basically, you can add either an executable or a library target to any type of project – you can even start with an “empty” project template and add the targets that you want.
However, please read the comments in the “Creating a Library Project” about the problems with adding an executable target and the need to create a ‘Custom Executable’ manually.
Adding C# Source Files
You can add a file based on the C# file template to any project. However, I don’t recommend trying to mix C# and other source files within a project. I have not tried this out, but the plugin makes an assumption that a’llfiles listed in the ‘Compile…’ and ‘Link…’ phases need to be processed by the (g)mcs compiler. I doubt if the compiler would be happy with non-C# source files!
Customisation
This section talks about how the plugin is constructed, the various parts of it, and where you should look if you want to start changing things.
I should be clear about this: I want people to take what I have and build on it. I know that know that there are many areas where this plugin could be improved, but I want to ‘publish’ it now, because I feel there is a need for it even in its current form, and I am reaching the limit of my understanding of Xcode and the (unpublished) plugin interface.
Template Files
All of the files described in this section, are resource files that are included in the plugin ‘application’ file.
Internally, each defines a set of (possibly nested) objects. Different objects have different values that can be controlled, but there are some common factors.
Firstly, values are defined in the general format of:
Name = value;
where ‘Name’ is the name of the value being set; and ‘value’ is a Boolean value (“YES” or “NO”, a numeric value, a string (quoted if it contains other than alphanumeric characters), or a list or dictionary. You’ll see examples of lists and dictionaries later on.
All object have three basic values:
- Identifier This is the internal name the object is referred to by other object. It is often in the form of a ‘reverse DNS’ name (e.g. com.mono.compilers.csharp.gmcs)
- Name A ‘human readable’ name (e.g. “Mono gmcs compiler”)
- Description A longer ‘human readable’ description of the object
Executable.trgttmpl and Library.trgttmpl
Xcode’s understanding of a plugin begins with the ‘Target Template’, and this plugin has two: one for the executable assembly target and the other for a library assembly target. The Executable file is as follows:
{
    Class = Native;
    ProductType = "com.mono.product-type.executable";
    Description = "Target for building an application that uses the Mono .NET environment";
    CustomBuildSettings = {
        INSTALL_PATH = "$(HOME)/Applications";
        PRODUCT_NAME = "«PRODUCTNAME».exe";
        EXECUTABLE_EXTENSION = "exe";
        TARGET_TYPE = "-target:exe";
    };

    BuildPhases = (
        {
            Class = Sources;
        },
        {
            Class = Frameworks;
        },
    );
}
The Library.trgttmpl is structurally the same with only a few values that differ.
The ‘CustomBuildSettings’ dictionary specifies the name of the product and where it will be placed. It also specifies the ‘TARGET_TYPE’ value that will eventually be passed to the compiler. The Library version has the appropriate value for building a library assembly.
The ‘BuildPhases’ tells Xcode which build phases to create within the target: in this case the Sources (‘Compile Sources’) and Frameworks (‘Link Binaries With Libraries’) phases.
You will notice that there is no ‘identifier’ in this file; rather there is a ‘ProductType’ entry. The value of this item is used as the starting point into all of the other objects required to integrate C#/Mono into Xcode. In this case it points to the ‘product type’ definition found in the next file.
CSharp.pbprodspec
This file contains two ‘product specification’ object definitions. The following is the one related to the ‘executable’ product:
{
    // Mono Executable Assembly (.exe) Identifier = com.mono.product-type.executable;
    Class = MonoProductSpecificationCS;
    Name = "Mono Executable Builder";
    Description = "Mono Executable Assembly Builder";
    IconNamePrefix = "TargetExecutable";
    DefaultTargetName = "Application";
    SupportsZeroLink = NO;
    Vendor = "Mono";
    AllowedBuildPhaseTypes = ( Sources, Frameworks );
    DefaultBuildProperties = {
        ARCHS = (mono);
        VALID_ARCHS = (mono, i386, ppc );
        FULL_PRODUCT_NAME = "$(PRODUCT_NAME).exe";
    };
    PackageTypes = (
        com.mono.package-type.executable // default
    );
},
As well as the standard ‘Identifier’, ‘Name’ and ‘Description’ items, the top level
of items contains a ‘Class’ item. The value of this item refers to an Objective-C class
that will be called to set up the environment ready to build a target.
My experimenting has not really come up with much meaning for the ‘IconNamePrefix’ and ‘DefaultTargetName’ items. Also the ‘Vendor’ item seems to be for internal documentation only. While the ‘SupportsZeroLink’ item value is reflected in the options for a target, the plugin code does not use this value.
I think the ‘AllowedBuildPhaseTypes’ item allows refinement of the build phases defined in the Target Template, but in this case they are the same.
Within the ‘DefaultBuildProperties’ dictionary, the ‘VALID_ARCHS’ and ‘ARCHS’ items set the possible ‘Architecture’ option values as well as the initial default one. The selected architecture is also passed to the compiler code, but is ignored by the plugin at this stage. The “mono” architecture is defined in the “Mono.xcspec” file described below.
The ‘FULL_PRODUCT_NAME’ item sets the name of the product. In this case it is the name of the project with a ‘.exe’ extension added.
The main item in this definition is ‘PackageTypes’ which links to the package definition object described next.
CSharp.pbpackspec
This file contains the package specifications for both the executable and library assemblies. The executable definition follows:
// Mono executable assembly
{
    Identifier = com.mono.package-type.executable;
    Name = "Mono Executable Assembly";
    Description = "Mono assembly that can be run";
    DefaultBuildSettings = {
         PACKAGE_TYPE = EXECUTABLE;
         EXECUTABLE_SUFFIX = ".exe";
         EXECUTABLE_NAME = "$(PRODUCT_NAME)$(EXECUTABLE_SUFFIX)";
         EXECUTABLE_PATH = "$(EXECUTABLE_NAME)";
         GENERATE_PKGINFO_FILE = NO;
    };
    ProductReference = {
        FileType = compiled.mono.executable;
        Name = "$(PRODUCT_NAME).exe"; // always assumed to be relative to $(BUILD_DIR)
        IsLaunchable = YES;
    };
},
I have found that changing the items defined within the ‘DefaultBuildSettings’
does not appear to do much.
On the other hand, the ‘ProductReference’ part is very important. ‘FileType’ references the file type (see CSharp.pbfilespec later) object that tells Xcode the type of file that is created. I’m not sure if the ‘Name’ entry here, or the ‘FULL_PRODUCT_NAME’ item in the product specification actually sets the product name, but both have the same values here and it gets set to what it should be!
CSharp.pbfilespec
This file defines the types of files that are used within the plugin. In this case there are 3:
- A C# source file
- An executable assembly
- A library assembly
The following shows the definitions for the source file and the executable assembly.
{
    // C-Sharp source code
    Identifier = sourcecode.csharp;
    BasedOn = sourcecode;
    Name = "C# File";
    Extensions = (cs, csharp);
    MIMETypes = ("text/C#");
    ComputerLanguage = csharp;
    IsTextFile = YES;
    IsSourceCode = YES;
    AppliesToBuildRules = YES;
    ChangesCauseDependencyGraphInvalidation = YES;
    },
    {
        // Executable (.exe) file
        Identifier = compiled.mono.executable;
        BasedOn = compiled;
        Name = "Mono Executable File";
        Extensions = (exe);
        TypeCodes = (APPL);
        IsTextFile = NO;
        IsSourceFile = NO;
        IsExecutable = YES;
        IsExecutableWithGUI = NO;
        IsTransparent = NO;
        IsApplication = NO;
        IsBundle = NO;
        ContainsNativeCode = NO;
        AppliesToBuildRules = NO;
        ComputerLanguage = csharp;
},
The definition of an object can operate in a semi-object-oriented manner, with one definition building on another. In this case the source definition builds on the ‘source’ definition that is built into Xcode9.
The various items are all fairly self-explanatory. The ‘ChangesCauseDependencyGraphInvalidation’ item causes the target to be rebuilt when a contributing file is modified. While not shown here, this item is also applied to the library assembly definition so any rebuilding of the assembly will cause a rebuild of other dependent assemblies.
9It’s actually defined in one of the definition files that Xcode reads in as it starts up form the system library.
CSharp.pblanspec
This definition file is used by the editor to allow syntax colouring and other editor-level operations.
The beginning of the file is as follows:
{
    Identifier = csharp;
    Name = "CSharp";
    Description = "CSharp source file";
    BasedOn = "pbx_root_language";
    SourceScannerClassName = PBXCPPSourceScanner;
    SupportsIndentation = YES;
    Indentation = {
    };
    SyntaxColoring = {
        CaseSensitive = YES;
        UnicodeSymbols = YES;
        UnicodeEscapes = YES;
        IndexedSymbols = YES;
        CommentsCanBeNested = YES;
        IdentifierStartChars = "_";
        IdentifierChars = "_";
        MultiLineComment = (
            ( "/*", "*/" )
        );
        String = (
            ( "\"", "\"" )
        );
        EscapeCharacter = "\\";
        Character = (
            ( "'", "'" )
        );
        SingleLineComment = ( "//" );
        DocComment = "///";
        DocCommentKeywords = (
            "summary",
            "param",
            "returns"
        );
        Keywords = (
            "abstract",
            "as",
            "base",
            "bool",
            "break",
I believe that, if you understood what the method definitions should be, that you could write a suitable class definition and reference it in the ‘SourceScannerClassName’ item and so improve the integration of the language with the editor. I’m guessing that this would overcome the issue the plugin currently has in (for example) not knowing about property accessors – the editor simply shows that the cursor is in the class definition, whereas it can understand a method definition enough to reference its name.
Mono.xcspec
This definition file defines an additional ‘architecture’ that can be referenced within Xcode. In this case it defines the ‘mono’ architecture:
(
    // Mono - architecture independent
    {
        Type = Architecture;
        Identifier = mono;
        Name = "Mono IDL";
        Description = "Mono architecture -independent of any hardware";
        ByteOrder = little;
        ShowInUI = YES;
        // SortNumber = 53;
    },
)
I have no idea what the ‘SortNumber’ does, but it appears in some other architecture definitions and is commented out in others: either way this definition seems to make Xcode happy.
Architectures seem to come into their own when a source file can be compiled for several different hardware devices. If multiple architectures are specified for a target, then the compiler is called once for each architecture for each source file, and the resulting object code is supposed to be placed into part of the internal directory tree for that architecture. This does not apply in this situation as Mono compiles the C# into a platform independent form. I suppose if you tried to mix C# and other languages together it may be needed, but how you would get that to work in beyond what I want to think about right now!
CSharp.xcbuildrules
This definition file links a source file with its compiler:
(
    {
        // .NET V2 compatible compiler
        // Note: The monoCompilerSpecificationCS.m doesn't actually use this
        // It uses option values to select the V1/V2 compiler (mcs/gmcs)
        Name = "Mono Source rule";
        FileType = sourcecode.csharp;
        CompilerSpec = com.mono.compilers.csharp.gmcs;
    },
)
When Xcode wants to compile a ‘sourcecode.csharp’ file (see the .pbfilespec
definition), it will use this definition to select the
‘com.mono.compilers.csharp.gmcs’ compiler definition.
CSharp.pbcompspec
This definition file tells Xcode how to compile C# source files. The start of it is as follows: {
   Type = Compiler;
   Identifier = com.mono.compilers.csharp.gmcs;
   Class = MonoCompilerSpecificationCS;
   Name = "Mono gmcs Compiler";
   Description = "Mono development projects gmcs compiler for C# code";
   Version = "2.0";
   Vendor = "Mono";
   Languages = (csharp);
   Architectures = ( mono, i386, ppc );
   FileTypes = (sourcecode.csharp);
   ExecPath = "/usr/bin/gmcs";
   CommandOutputParser = MonoOutputParser;
   SupportsZeroLink = NO;
   SupportsPredictiveCompilation = NO;
   Options = (
       {
       Name = OTHER_CSHARPFLAGS;
       Type = stringlist;
       DefaultValue = "";
       CommandLineArgs = { "" = ();
       "<<otherwise>>" = ("${0}");
       };
       Category = Building;
       },
       {
       // Adds the module to the generated assembly
       Name = CS_ADDMODULE;
       Type = stringlist;
       DefaultValue = "";
       CommandLineArgs = ( "--addmodule:${0}" );
       Category = Building; CommonOption = NO;
       },
       {
       //Set default context to be checked
       Name = CS_CHECKED;
       Type = bool;
       DefaultValue = YES;
       CommandLineArgs = { YES = (); NO = ("-checked-"); };
       Category = CodeGeneration;
       CommonOption = NO;
       },
       {
       // Sets the code page
       Name = CS_CODEPAGE;
       Type = enum;
       AllowedValues = ("", "Latin1", "utf8", "reset");
       DefaultValue = "";
       CommandLineArgs = { "" = (); "<>" = ("-codepage:${0}"); };
       Category = Language;
       CommonOption = NO;
       },
The rest of the file contains other option definitions.
Most of the items are (I think!) self-explanatory. Two interesting items are ‘Class’ and ‘CommandOutputParser’, both of which refer to Objective-C classes to handle compiling each source file, and to convert the compiler output into the form expected by Xcode to allow navigation in the editor to errors. I discuss these classes later on.
The ‘ExecPath’ item value is not actually used as it is hard-coded into the class, because the class uses the ‘.NET Version’ [CS_DOTNETVERSION] option value to select the mcs or the gmcs compiler.
At this stage, I can’t find enough information about how Xcode handles predictive compiling to use this function. Therefore, the ‘SupportsPredictiveCompilation’ item value is set to “NO”.
I have listed the first few options, mainly to show some of the variations that can be used. The ‘Name’ item is how the option is referred to internally. The name can also be used (apparently, according to the various books I’ve read) in scripts used in Custom Executable definitions etc..
The ‘Type’ can be:
- string A single string value
- stringlist Multiple string values
- bool Either YES or NO
- enum One of a set of possible values as specified in ‘AllowedValues’
Depending on the ‘Type’, the ‘DefaultValue’ takes on the appropriate type.
I have found no impact form setting the ‘CommonOption’ item value to be either YES or NO.
The ‘Category’ item (I think) can take any value, but the ones listed in the various options are those that I have found in the examples I’ve used. The category values appe’arin the ‘Collection’ drop-down list in the ‘Build’ tab of the “Target” inspector, and also seem to affect the order in which the options appear within the main body of the inspector.
The ‘CommandLineArgs’ item seems to have several effects. Firstly, if you don’t have this item, then the Objective-C code that automatically build the command-line arguments form these options will not include the option. Also, be careful to use the right combination of brackets and braces in the value part: brackets surround a single value, and brackets surround a list of values. The “${0}” value seems to be the only one ever used and equates to the value of the option as entered by the user; except for the ‘stringlist’ options where it represents the current value in the list – the whole value is repeated once for each entry in the string list.
Other object definitions seem to allow options to be specified, but I have not been able to find where these appear within the user interface within Xcode. Only the. pbcompspec options appear in the Target -Build inspector.
Csharp.pblinkspec
This file defines the linker to be used. Xcode locates the linker by calling the ‘linkerSpecificationForObjectFilesInTargetBuildContext’ method in the MonoProductSpecificationCS.m class. It returns a reference to the appropriate identifier; in this situation the reference is to this definition:
(
    {
        Identifier = com.mono.compilers.csharp.linker;
        Class = MonoLinkerSpecificationCS;
        Name = "CSharp Assembly Builder";
        Description = "C# Assembly Builder";
        Version = "V2";
        Vendor = "Mono";
        Languages = (csharp);
        BinaryFormats = ( compiled.mono.executable, compiled.mono.library );
        Architectures = (mono, i386, ppc);
        ExecPath = "/usr/bin/gmcs";
        InputFileTypes = ( sourcecode.csharp, compiled.mono.library);
        Options =
        (
             {
                //Set default context to be checked
                Name = CS_DEBUG;
                Type = bool;
                DefaultValue = NO;
                CommandLineArgs = { YES = ("-debug+"); NO = (); };
                CommonOption = YES;
             },
        );
    }
)
I’m not at all sure if Xcode uses the ‘BinaryFormats’ and ‘InputFileTypes’ in
anyway, but they don’t seem to do any harm as they are here. Looking at the
‘Architectures’ value as I write these notes, I think I should take out the non-“mono’
items – but again my testing of the plugin has worked. Ditto for the ‘Options’
dictionary – I can’t see where Xcode uses this, but it is probably just my lack of understanding of the whole plugin thing!
As with the compiler specification file, the ‘ExecPath’ value is ignored by the class referenced in the ‘Class’ item which is called once to link the files and is passed all of the input files as well as all “library” files in the “Link Binary With Libraries” build phase.
CSharp.pbRTSspec and CSharp.pbbsetspec
I’ve included these files because they were in one of the other plugin’s that I based this one on. At the time I had no idea what they did – and still don’t! If I recall, the .pbbsetspec object was referenced within a method in one of the classes that I eventually removed as it never appeared to be called and nothing seemed to break when I removed it.
Also, I think the .pbRTSspec definition is somehow supposed to tell Xcode how to run the program, but I could not figure out how this is done (I ended up ‘hacking’ the “default.pbxuser” file in the Executable project template to create a suitable “Executable” object).
com.mono.compilers.csharp.strings (English)
This file provides more readable names and descriptions for the various options as they appear in the Target Inspector’s Build tab. The format is fairly obvious (I hope).
Looking at the similar files used by Xcode itself, there are additional capabilities (especially with respect to enum values etc.) over what I have here.
Many of the option comments are taken form, or heavily derived from, the equivalent compiler command-line option description in the mcs ‘man’ page or the ‘man –help’ output. I’ve modified some of the descriptions to make then suitable for the Xcode option context, or to clarify the way the option is used within this plugin (e.g. no file-specific options).
Objective-C Files
Let me make one thing well known: I don’t know Objective-C. This is the first time I’ve ever had anything to do with it, so whatever you see in these files is almost certainly copied (if it is any good) or crying out for improvement (my contributions). Therefore, feel free to correct anything you see.
I have no idea how to debug this code, especially in the context of an Xcode plugin. That is why you may well find some fopen/fprintf/fclose code commented out in some of the modules – it was the only way I knew of to find out what was going on; that and lots (and lots) of compile/link/copy/start Xcode/look at file/edit/compile…. Iterations.
One concept that needs to be understood, is that the plugin code is called to build a dependency graph10and the necessary command operations to create the output files from the input ones as necessary. The commands are not performed as the plugin operates, but may or may not be called later on if the input files are newer than any of the output files for a node in the graph.
In general, the main graph building methods are passed one or more source file names and an expected output file name. From these, the code creates ‘nodes’ which are connected by ‘commands’.
With that said, the following descriptions outline the code.
10Note that this is a dependency graph, not just a dependency tree. There can be multiple output files from each node.
Xcode API
There are a number of header files that are stored in this area, all of them taken directly from one or another of the plugin’s this one is based on. I don’t think they are all referenced (for example I don’t think XCPSourceParsing.h is referenced anywhere) but I have the feeling that they may well be useful in the future.
MonoProductSpecificationCS.m/.h
The ‘initializeBuildSettingsInTargetBuildContext’ method is called once at the start of the dependency generation process. Therefore, if you need to initialize anything, this is the place to do it. No such initialisation is required for this plugin.
The ‘linkerSpecificationForObjectFilesInTargetBuildContext’ method is called to find the definition object for the linker.
MonoCompilerSpecificationCS.m/.h
There is only a single method called in this class: ‘computeDependenciesForInputFile: ofType: variant: architecture: outputDirectory: inTargetBuildContext:’ which is called once for each source file in the target “Compile Sources” group.
The method first checks to see if this is the first source file passed to it in this graph generation process. This is done by looking for the “product” node – if it does not exist, then it is created and the overall (g)mcs command is created with it as its output.
If the product node already exists, then the source node is added to the (by now) existing command.
As the command is being created, it looks to see the value of the CS_DOTNETVERSION option and uses this to select between the mcs and gmcs compiler.
MonoLinkerSpecificationCS.m/.h
The main method of this class is ‘computeDependenciesForFilePaths: outputPath: inTargetBuildContext:’ and it is called only once. It is passed all of the output form the compiler invocations (in effect none in this instance as each source file does not create a separate object file), and all of the library files in the target ‘Link Binary with Libraries’ build phase.
The code adds each ‘library’ (actually library assemblies) as a ‘-reference’ command line option.
It also adds in a couple of other command-line elements: namely the ‘-target’ and ‘out’ options. These are added here for ‘historical’ reasons (early versions of this plugin tried to ‘compile’ each source file by copying it somewhere else and then passing the copy to this method to be more in keeping with the ‘spirit’ of the separate compile and link operations – then I realised that the current way was much better and allowed for error-line notification form the compiler to the editor).
MonoOutputParser.m/.h
This code is hung together by small bits of string at the best of times. It appears to be called for each line of output from the compiler, and I have managed to get some (pseudo-)regular11expressions going which pick out the ‘error’ and ‘warning’ lines emitted.
Further I seem to have found how to get the line number, source file name and error message to be passed back to Xcode, but I believe that this is rather ‘fragile’ code. I really don’t know the methods I’ve called within Xcode and certainly don’t know what others exist that may do the job better.
All I can say is that it seems to work for now in that errors and warnings are reflected back in Xcode and clicking on an error does take you to the reference line in the source code.
A LOT more could/should be done in this area.
11Some of the better known regular expression ‘operators’ didn’t seem to work with this RE engine.